• For more information on how to avoid pop-up ads and still support SkiTalk click HERE.

Potential binding conflict help

jski

Booting up
Skier
Joined
Jan 27, 2019
Posts
15
Hi All,

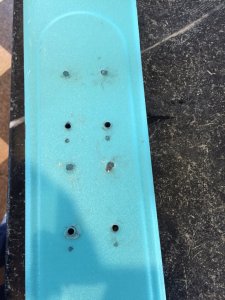
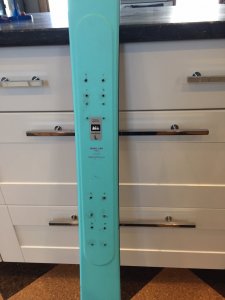
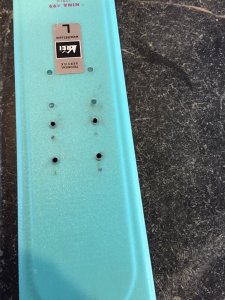
I just picked these skis up for my wife locally at a REI garage sale. They've been drilled twice, and while I was a little nervous about a potential conflict, I went for it.

I was hoping to mount the Tyrolia Attack 13 demo's on it, which I've seen on closeout. I downloaded a paper template and held it up to the ski, and it seemed fine, but it's not exactly precise.

Can any folks with lots of binding experience chime in? Anyone recognize the hole pattern?

The Tyrolias have 95 mm brake, and this waist is 99, but in the FAQ of the site, they mentioned being able to mount the 95 mm brake on 104 mm waist.

If Tyrolias won't work, can I move to another brand with different hole pattern?

Thanks!


IMG_3149.JPG IMG_3150.JPG IMG_3151.JPG
 

CalG

Out on the slopes
Pass Pulled
Joined
Feb 5, 2017
Posts
1,962
Location
Vt
I may be missing something, but it appears that your new location "dots" are forward of the old holes both at the toes and the heels by about the same amount.

Forward/ aft binding placement is somewhat subjective at best. Myself, I would set the bindings in the existing old holes and see how your boot fit and how the ski worked for you.

If the bindings won't adjust to your boot size, reposition as needed .

If you don't like the way the ski performs for you with that location, move to the new position of your liking.
 
Thread Starter
TS
J

jski

Booting up
Skier
Joined
Jan 27, 2019
Posts
15
Thanks, CalG

My wife has new boots in her future, so I don't have a BSL yet.

Barring a conflict, I was hoping to just put on the Tyrolias (or similar) and have the ability to adjust going forward.
 

Uncle-A

In the words of Paul Simon "You can call me Al"
Skier
Joined
Dec 22, 2015
Posts
10,977
Location
NJ
It may help if you place a rule with MM next to the holes and post a close up photo. It could help in binding identification.
 

Doug Briggs

"Douche Bag Local"
Industry Insider
SkiTalk Tester
Joined
Nov 9, 2015
Posts
7,550
Location
Breckenridge, CO
At the shop, we have pre-shaped wooden plugs. Glue the holes, bang the plugs in, cut them off and you are ready to go.

You can also epoxy the holes. Be sure to eliminate any voids in the hole with this method.

If the sets of holes are plugged and the marked locations are more than 1 cm from the old holes, you are good to go without any updates to the already plugged holes. What kind of skis are these? Do they require 4.1 mm holes or 3.5/3.6? If the former, that indicates they likely have metal in the top sheet or a binding mounting specific layer. They should be tapped after drilling. if the latter, just drill and mount.
 
Thread Starter
TS
J

jski

Booting up
Skier
Joined
Jan 27, 2019
Posts
15
Thanks. I can repost the pictures, but first I need to track down a mm ruler!

My primary concern is getting enough distance from those previously drilled holes with whatever gets mounted. Having worked with resin and hardener, I feel fine filling any old holes with epoxy.

My hope is that these were mounted with traditional bindings, and that if I put demo bindings on, I'll clear any existing holes.

I'm not sure what holes these particular skis require--they're DPS Nina Alchemist, which I think is all carbon.
 

Uncle-A

In the words of Paul Simon "You can call me Al"
Skier
Joined
Dec 22, 2015
Posts
10,977
Location
NJ
If you don't use any of the existing holes plug them as @Doug Briggs suggested above. If you can't find wood plugs a wood gulf tee may work just as well. It is as close to the shape of the screw that you will find and should be used with some form of adhesive to seal it in the hole.
 

DanoT

RVer-Skier
Skier
SkiTalk Supporter
Joined
Nov 12, 2015
Posts
4,806
Location
Sun Peaks B.C. in winter, Victoria B.C. in summer
I always thought those binding hole plugs were made of plastic. Are wooden plugs something new or better?
 

Doug Briggs

"Douche Bag Local"
Industry Insider
SkiTalk Tester
Joined
Nov 9, 2015
Posts
7,550
Location
Breckenridge, CO
I always thought those binding hole plugs were made of plastic. Are wooden plugs something new or better?

Most plugs are plastic. The reason for wood ones is that they hold up to being partially drilled. For instance, you need a hole for a new binding where an existing hole is. You plug it with wood, then with a jig you can drill into the wood and the ski interface. When you drill a plastic plug like that, the plug typically fails and you are left with a ragged hole. Epoxy is the best solution but the wood plugs are quicker as they don't require epoxy to implement; regular waterproof wood glue is fine for them.

Edit: I should add that if you partially drill as I mentioned, you would use a helicoil to make a more secure attachment point.
 
Last edited:
Thread Starter
TS
J

jski

Booting up
Skier
Joined
Jan 27, 2019
Posts
15
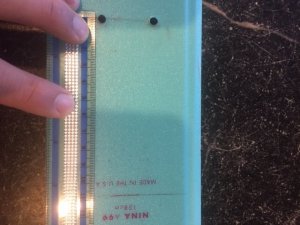
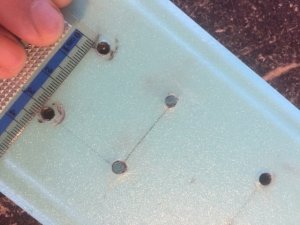
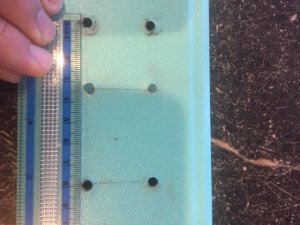
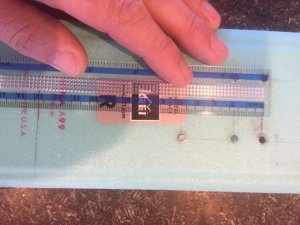
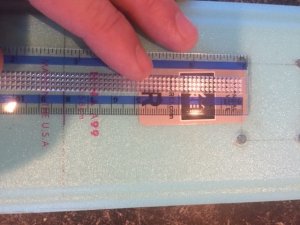
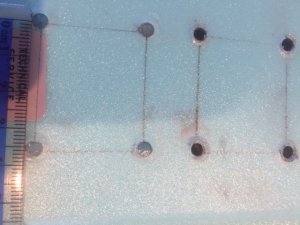
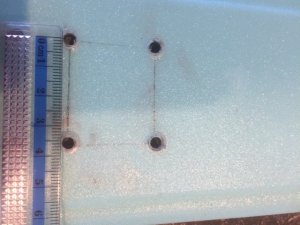
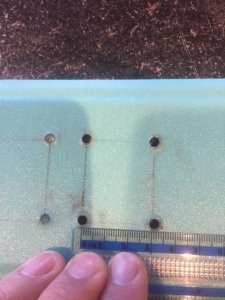
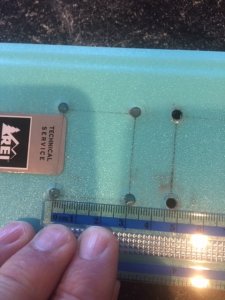
So finally some pictures with a mm ruler for scale.

It seems that the filled and open set of holes have the dimensions.

The toe holes are 36 mm left to right, and 30 mm front to back
The filled set of toe holes is 80 mm forward of the centerline, measuring from center to first line of holes.
The open set of holes is 128 mm forward of the centerline, measuring from center to first set of holes.

The heel piece measures 32 mm left to right and 80 mm front to back
The open set of holes starts at 108 mm behind the centerline.
The filled set is an additional 46 mm back, for an approximate total of 158 mm behind the centerline.

Thanks for looking--I'd really appreciate advice and insight!


IMG_3194.JPG IMG_3193.JPG IMG_3192.JPG IMG_3191.JPG IMG_3190.JPG IMG_3189.JPG IMG_3188.JPG IMG_3187.JPG IMG_3186.JPG
 

Doug Briggs

"Douche Bag Local"
Industry Insider
SkiTalk Tester
Joined
Nov 9, 2015
Posts
7,550
Location
Breckenridge, CO
So finally some pictures with a mm ruler for scale.

It seems that the filled and open set of holes have the dimensions.

The toe holes are 36 mm left to right, and 30 mm front to back
The filled set of toe holes is 80 mm forward of the centerline, measuring from center to first line of holes.
The open set of holes is 128 mm forward of the centerline, measuring from center to first set of holes.

The heel piece measures 32 mm left to right and 80 mm front to back
The open set of holes starts at 108 mm behind the centerline.
The filled set is an additional 46 mm back, for an approximate total of 158 mm behind the centerline.

Thanks for looking--I'd really appreciate advice and insight!


View attachment 69605 View attachment 69606 View attachment 69607 View attachment 69608 View attachment 69609 View attachment 69610 View attachment 69611 View attachment 69612 View attachment 69613

Do any of the marks represent where the paper template would put the Attack Demo holes? That would seem to be the crux of the matter: will there be conflict between new and old holes?
 

givethepigeye

Really, just Rob will do
Skier
Joined
Nov 13, 2015
Posts
1,709
Location
Charleston, SC
Conflicts don't conflict if you plug the holes with a glued dowel. The hardest chargers I know do it.

So you are saying that if I plug some holes that are less than 10mm ctc or whatever the tolerance (saw 7-8mm references somewhere too) with a wood dowel/plug in lieu or the plastic - it’s like that previous hole was never there? Drill away?

Just wood glue or epoxy it, tap it in chisel off the top and good to go?

Not doubting, just have never heard that one. A shop would be ok doing this?
 

Doug Briggs

"Douche Bag Local"
Industry Insider
SkiTalk Tester
Joined
Nov 9, 2015
Posts
7,550
Location
Breckenridge, CO
So you are saying that if I plug some holes that are less than 10mm ctc or whatever the tolerance (saw 7-8mm references somewhere too) with a wood dowel/plug in lieu or the plastic - it’s like that previous hole was never there? Drill away?

Just wood glue or epoxy it, tap it in chisel off the top and good to go?

Not doubting, just have never heard that one. A shop would be ok doing this?

I've done it. I will typically still use a heli-coil, too, though. If you fill with a dowel and glue and are confident there is no void in the old hole, then the heli-coil could be overkill. I rather over engineer than under.
 

DanoT

RVer-Skier
Skier
SkiTalk Supporter
Joined
Nov 12, 2015
Posts
4,806
Location
Sun Peaks B.C. in winter, Victoria B.C. in summer
will there be conflict between new and old holes?

If there is conflict between new and old holes it would only be a concern if the binding/ski is going to be set up to accommodate a wide range of boot sizes. If OTOH the OP is just setting the ski up for himself, then the toe and heel track plates can be re-positioned away from the existing holes. This would then result in less range of different sized boot compatibility.

Here is what I would do: Position the boot on the ski so the centre mark on the boot lines up with the centre line on the ski, then slide the toe and heel piece loosely in place while adjusting the position of the toe and heel on their tracks so that the holes in the track are far enough away from the existing holes.
 
Thread Starter
TS
J

jski

Booting up
Skier
Joined
Jan 27, 2019
Posts
15
I took these in to a local shop, and they're mounting Marker Squire demo's.

For the most part there won't be a conflict and a few holes (two on the heel) can be re-used. Those will be heli-coiled. Seems like a good solution, since these will likely spend their time on green and blue groomers.

Thanks for the earlier advice.
 

Sponsor

Staff online

Top