• For more information on how to avoid pop-up ads and still support SkiTalk click HERE.

Help, Advice Needed

Bob Simpson

Putting on skis
Skier
Joined
Nov 19, 2016
Posts
81
Location
Sheridan, Wyoming
Hello Pugskiers!
I am in need of help and, or advice for a situation I have with a Kastle MX89's. First, a bit about me; I grew up working in ski shops. First in the wax room, then to the shop as a tech, later owning my own shop, so I do have plenty of experience with this.
I bought these Kastle MX89's thinking it would be no problem repairing what appeared to be a simple, small delamination in the shovel. Well, after 3 tries using ski specific, slow curing epoxy, I have failed to repair the ski! If any of you have a suggested epoxy that they've had successful experience with, I'm all ears! Secondly, I was thinking that perhaps I could buy a single MX89 from Kastle that they may have as a result of their warranty program. I did try to email Kastle, and received a reply back in German! Thank God for Google translation! LOL. The translation let me know that link was no longer active. I would greatly appreciate any contact information any of you have for Kastle so I can inquire about the single ski purchase. Lastly, I do recall reading on here a glue that actually works with titanal metal, but it was only available in Australia. Any more leads on that? Please see attached pic to get a better idea.
Thanks!
Bob
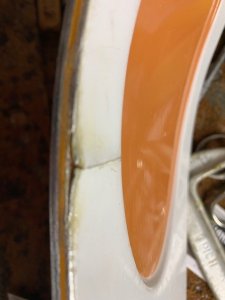
shovel89.jpg
 

Doug Briggs

"Douche Bag Local"
Industry Insider
SkiTalk Tester
Joined
Nov 9, 2015
Posts
7,543
Location
Breckenridge, CO
I've used West System 3 with some success. Also some LOCTITE EA 608 Adhesive. I also like Gorilla 5 minute as well as Devcon 5 minute epoxies.

The biggest problem is that the top sheet is bent away from the ski itself. That stress is hard to overcome. Tight clamping while the epoxy sets is important. You also may want to clean out the void with a dremel to remove any old epoxy and expose fresh ski material.
 
Thread Starter
TS
Bob Simpson

Bob Simpson

Putting on skis
Skier
Joined
Nov 19, 2016
Posts
81
Location
Sheridan, Wyoming
I've used West System 3 with some success. Also some LOCTITE EA 608 Adhesive. I also like Gorilla 5 minute as well as Devcon 5 minute epoxies.

The biggest problem is that the top sheet is bent away from the ski itself. That stress is hard to overcome. Tight clamping while the epoxy sets is important. You also may want to clean out the void with a dremel to remove any old epoxy and expose fresh ski material.

Thanks! I did clean out all three times, but I used a very small drill bit as my Dremel bit is wider than the delam. I did blow the epoxy down into the delam with warm air and clamped nice and tight. Appreciate your help! Looks like I'll try the Loctite next. Hoping someone comes through with some Kastle contact info!
Bob
 

Monster

Monstrous for some time now. . .
Skier
Joined
May 8, 2018
Posts
172
Location
NH
I agree with Doug - That bend in the top sheet is tough to correct and it's asking a lot of any glue to hold it down.

Can't quite tell from the image, but is it a metal sheet that's raised too, or just plastic?

If it's metal, you could try inserting a small object into the delam from the side to use as a mandrel, like a medium-size sewing needle, back to near the start of the lift and then try to press the bend down bit by bit working towards the surface crack. It would never go completely flat, but maybe you could get it to lay down mostly, then fill with epoxy and not clamp it down, just put some packing tape over the seams to keep the glue in while it cures - basically fill it and live with whatever bulge you were left with on the top sheet. At least you might have a lasting bond and a water tight ski again. I doubt you'd feel it on snow.

If it's just the plastic, you could try the same thing while applying heat to the top sheet with a heat gun to soften it for bending. You'd have to be careful not to over-heat, maybe use a flow locating tip on the gun to it hit a smaller area, or cut a hole like the size of a quarter in a piece of flashing to use as a mask. If you got it soft and it responded to the bending, you could clamp it flat while it cooled and hardened, then try gluing it.
 
Thread Starter
TS
Bob Simpson

Bob Simpson

Putting on skis
Skier
Joined
Nov 19, 2016
Posts
81
Location
Sheridan, Wyoming
I agree with Doug - That bend in the top sheet is tough to correct and it's asking a lot of any glue to hold it down.

Can't quite tell from the image, but is it a metal sheet that's raised too, or just plastic?

If it's metal, you could try inserting a small object into the delam from the side to use as a mandrel, like a medium-size sewing needle, back to near the start of the lift and then try to press the bend down bit by bit working towards the surface crack.


Great idea!! It is metal, and from what I've read on this site, this titanial aluminum is very hard to get to bond. I will use the mandrel idea next!!
 

Doug Briggs

"Douche Bag Local"
Industry Insider
SkiTalk Tester
Joined
Nov 9, 2015
Posts
7,543
Location
Breckenridge, CO
Alternatively you could remove the top sheet that is detached and just fill with epoxy. I've done that on a pair of MX88s.
 

Monster

Monstrous for some time now. . .
Skier
Joined
May 8, 2018
Posts
172
Location
NH
Alternatively you could remove the top sheet that is detached and just fill with epoxy. I've done that on a pair of MX88s.
Yes, treat it like a veneer repair - cut a piece out to where it's not distorted and let in a new piece of similar material. Maybe the best bet.
 

trailtrimmer

Stuck in the Flatlands
Skier
Joined
Oct 18, 2016
Posts
1,135
Location
Michigan
I agree with Doug - That bend in the top sheet is tough to correct and it's asking a lot of any glue to hold it down.

Can't quite tell from the image, but is it a metal sheet that's raised too, or just plastic?

If it's metal, you could try inserting a small object into the delam from the side to use as a mandrel, like a medium-size sewing needle, back to near the start of the lift and then try to press the bend down bit by bit working towards the surface crack. It would never go completely flat, but maybe you could get it to lay down mostly, then fill with epoxy and not clamp it down, just put some packing tape over the seams to keep the glue in while it cures - basically fill it and live with whatever bulge you were left with on the top sheet. At least you might have a lasting bond and a water tight ski again. I doubt you'd feel it on snow.

The top sheet is torn and may be interfering with itself trying to get it to lay flat. When tears like this happen, metal/plastic typically stretches and may never lay flat again without removing some material. You may need to trim a tiny bit of material off inside the torn edge to avoid pre-loading it even if it's clamped.

That being said, the location on the bend isn't likely to ever hold a repair for long, that tip sees lots of action. If it fails again, I'd just full the void with epoxy and let it ride. Unless you want to do a full blown frankenfix with screws and ptex, I'm guessing most repairs on that narrow spot by the insert don't have the support to make it lasting.
 

Doug Briggs

"Douche Bag Local"
Industry Insider
SkiTalk Tester
Joined
Nov 9, 2015
Posts
7,543
Location
Breckenridge, CO
Alternatively you could remove the top sheet that is detached and just fill with epoxy. I've done that on a pair of MX88s.
I will try to post a picture of the ski I did that too later today. While it's not beautiful it has held up and could be worse. The most important thing is that it isn't a snag to further damage at the ski.
 

Doug Briggs

"Douche Bag Local"
Industry Insider
SkiTalk Tester
Joined
Nov 9, 2015
Posts
7,543
Location
Breckenridge, CO
Here are the pictures.

I used DevCon epoxy and added a little while chalk to try to match the ski's topsheet and failed miserably.

IMG_20190226_133113569_HDR.jpg

I guess I was able to repair the damage in the tip after all. I suspect it wasn't as raised as in your case.

IMG_20190226_133125710.jpg

This is an example of just removing the topsheet material and filling.

IMG_20190226_133208466.jpg

This one, I filed down so it was flush and not grabby. There is some epoxy in there to prevent water penetration.
 
Thread Starter
TS
Bob Simpson

Bob Simpson

Putting on skis
Skier
Joined
Nov 19, 2016
Posts
81
Location
Sheridan, Wyoming
Update on repair attempt: I took the advice of cutting the crack and making it a bit wider. I used a 1/16th drill bit to thoroughly clean out the delamination, then used West Systems epoxy. Repair looked great! After a day of skiing all over Bridger Bowl, unfortunately, the repair failed. I will now take the the advice offered by Doug Briggs, and cut out an area to the delam then fill the void with West Systems epoxy. Hopefully, this will last and keep out the water!
As an aside, the skiing at Bridger is fantastic if anyone is traveling to Montana!
Thanks!,
Bob
 

otto

Out on the slopes
Masterfit Bootfitter
Joined
Sep 17, 2016
Posts
364
At this point, you will not get epoxy to bond after 3 failed attempts. Since it appears to be a delam that is in the tip and will not affect the on-snow behaviour of the ski, Use rivets to permanently "clamp" the repair so that there are not shearing forces that will inevitably break loose the bond. Pictures are of a similar repair that continued to come apart...


upload_2019-3-13_18-51-28.jpeg
 
Thread Starter
TS
Bob Simpson

Bob Simpson

Putting on skis
Skier
Joined
Nov 19, 2016
Posts
81
Location
Sheridan, Wyoming
At this point, you will not get epoxy to bond after 3 failed attempts. Since it appears to be a delam that is in the tip and will not affect the on-snow behaviour of the ski, Use rivets to permanently "clamp" the repair so that there are not shearing forces that will inevitably break loose the bond. Pictures are of a similar repair that continued to come apart...


View attachment 68389 View attachment 68390

That is perhaps in the future! I'm going to try cutting the area out ,as suggested by Doug, and use the epoxy as a filler rather than to adhere. The repair you showed looks pretty badass!!
 

trailtrimmer

Stuck in the Flatlands
Skier
Joined
Oct 18, 2016
Posts
1,135
Location
Michigan
I wouldn't cut anything out, just tape the crack and fill it with epoxy as is without clamping it. The minute you cut all that material out you are no longer bridged to the rest of the ski with the top sheet.

Either epoxy fill, or screw/rivet fix like otto posted.
 

pchewn

Skiing the powder
Skier
Joined
Apr 24, 2017
Posts
2,636
Location
Beaverton OR USA
When repairing with adhesives, there can never be too much cleaning, preparation, and holding/clamping. You also need the ski to be at a nice warm temperature, and perhaps to warm up the epoxy a little bit to get it to flow like water into all of the cracks and micro-gaps.
 
Thread Starter
TS
Bob Simpson

Bob Simpson

Putting on skis
Skier
Joined
Nov 19, 2016
Posts
81
Location
Sheridan, Wyoming
When repairing with adhesives, there can never be too much cleaning, preparation, and holding/clamping. You also need the ski to be at a nice warm temperature, and perhaps to warm up the epoxy a little bit to get it to flow like water into all of the cracks and micro-gaps.

Thanks. I did all of what you mentioned, but as pointed out earlier, the metal curve of the top skin was too much for the adhering ability of the epoxy.
 
Thread Starter
TS
Bob Simpson

Bob Simpson

Putting on skis
Skier
Joined
Nov 19, 2016
Posts
81
Location
Sheridan, Wyoming
When repairing with adhesives, there can never be too much cleaning, preparation, and holding/clamping. You also need the ski to be at a nice warm temperature, and perhaps to warm up the epoxy a little bit to get it to flow like water into all of the cracks and micro-gaps.

Thanks. I used to do this for a living, so I used a heat gun to make sure the epoxy thinned and flowed, and cleaned and roughed the repair area.
 
Thread Starter
TS
Bob Simpson

Bob Simpson

Putting on skis
Skier
Joined
Nov 19, 2016
Posts
81
Location
Sheridan, Wyoming
I wouldn't cut anything out, just tape the crack and fill it with epoxy as is without clamping it. The minute you cut all that material out you are no longer bridged to the rest of the ski with the top sheet.

Either epoxy fill, or screw/rivet fix like otto posted.

Thanks. Too late! I'm doing the fill technique like Doug showed earlier. Hoping it will work well since the epoxy only needs to adhere to one side. The other part of my original post was info on contacting Kastle to inquire about buying a single ski that they might have in their warranty pile.
 

Sponsor

Staff online

Top